TumbleRig · release 1.14.0 · 2026-09-28 · changes since v1.13.0

TumbleRig 1.14

Capture a character region by region and merge the weights with one node, let separate pieces such as a coat bind like the body under them, and keep a spline's layer controls local. The viewport tools stay light in scenes with many rigged characters. New node versions install next to the ones you already use.

1new node
2new node versions
8times faster Tool Panels
10changes shown with pictures
Get TumbleRig 1.14 on TumbleTrove WindowsLinuxmacOSFree on TumbleTrove, the marketplace for Houdini packages. Install it with TumbleTrove Desktop, or with hpm:
hpm add tumblehead/tumblerig@1.14.0
then hpm install. Older node versions stay installed, so saved scenes keep working.

Try them Every example on this page is in the Asset Browser under TumbleRig › Changelog › 1.14. Drag one into a network and it works, with a note on what to try.

New and updated nodes in 1.14
The big ones

Highlights

Four changes worth knowing first. Each one links to the place further down where it is shown in depth.

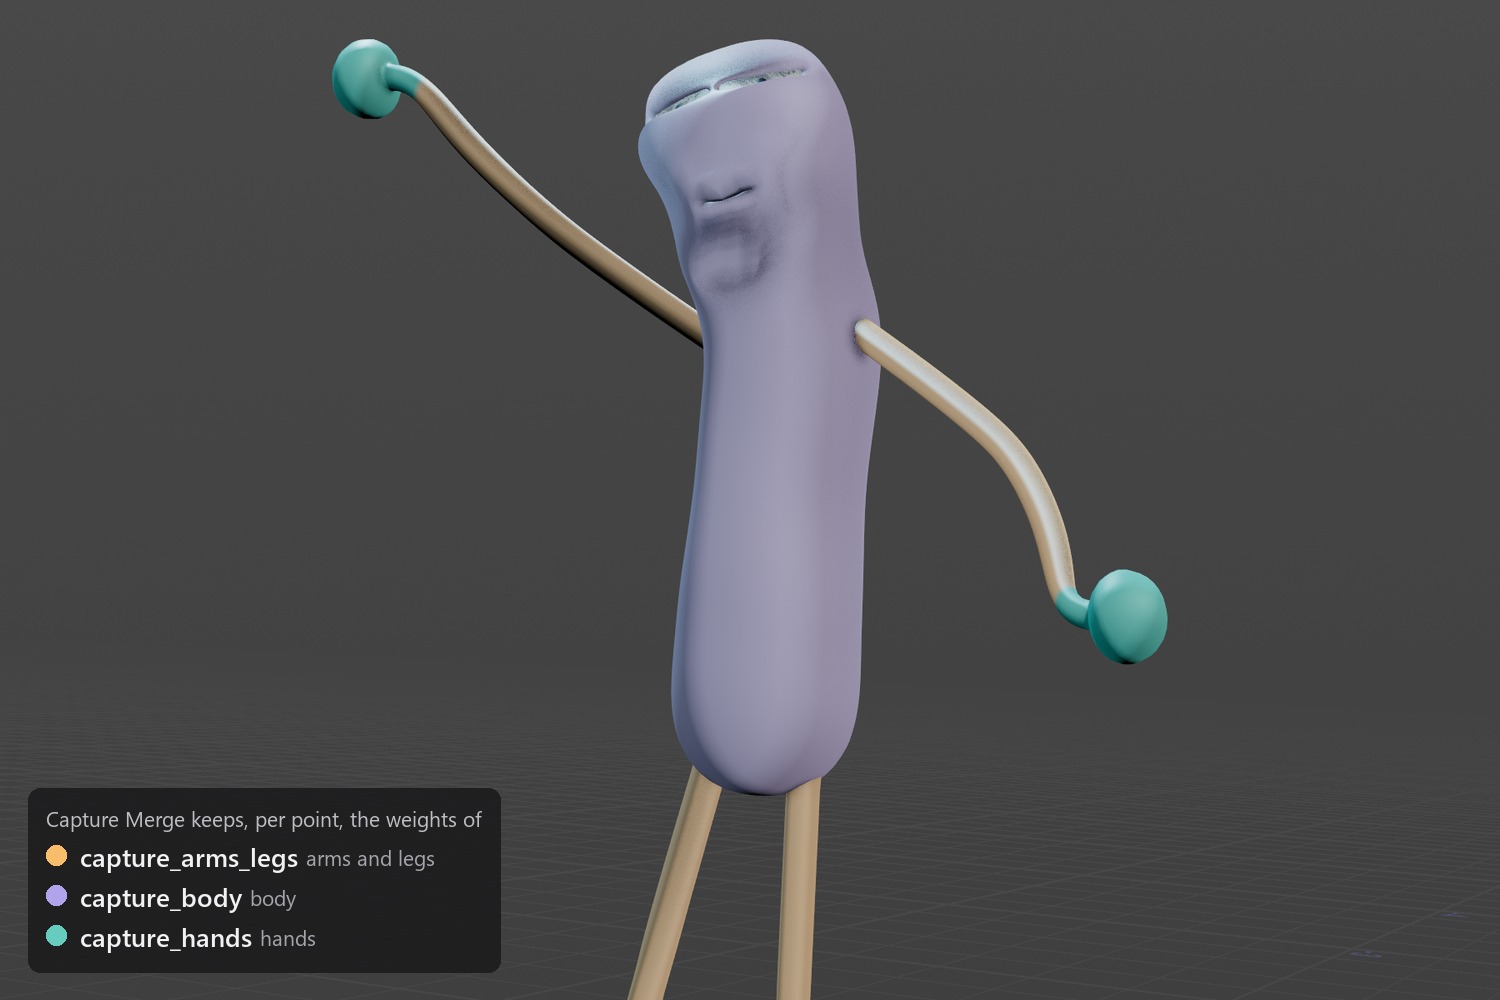
Three captures, one merge. The noodle captured region by region (arms and legs, body, hands, each its own Joint Capture), merged by Capture Merge and bent through apex_bonedeform; each point is tinted by the input it kept.
Newth::capture_merge::1.0

Capture Merge: capture region by region

One capture node gives the whole body one set of settings, but a hand wants tight cages and a torso a soft falloff. Capture each region with its own node and its own settings, then wire them all into Capture Merge, like a Merge SOP. Each point keeps the weights of the node that captured it, and apex_bonedeform moves every region exactly as its own capture would.

In depth in Capture
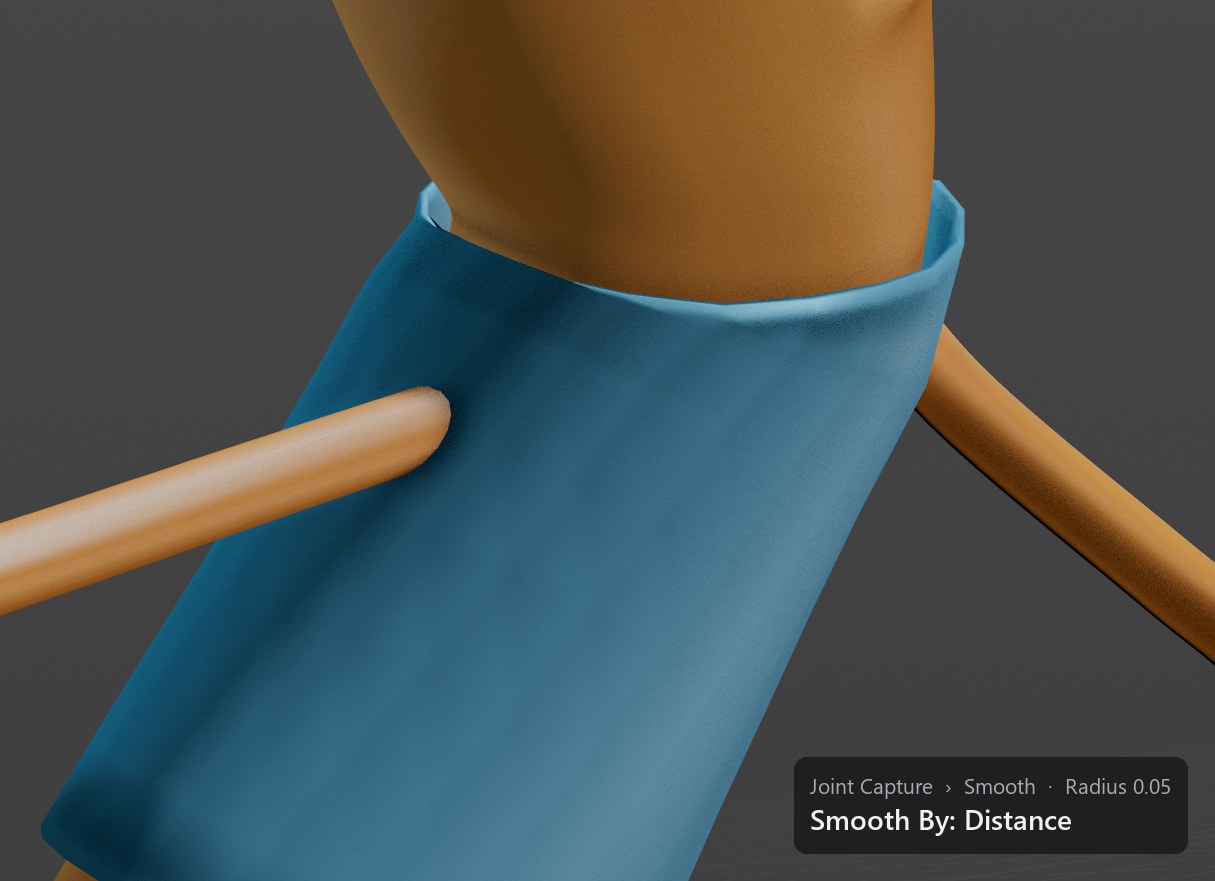
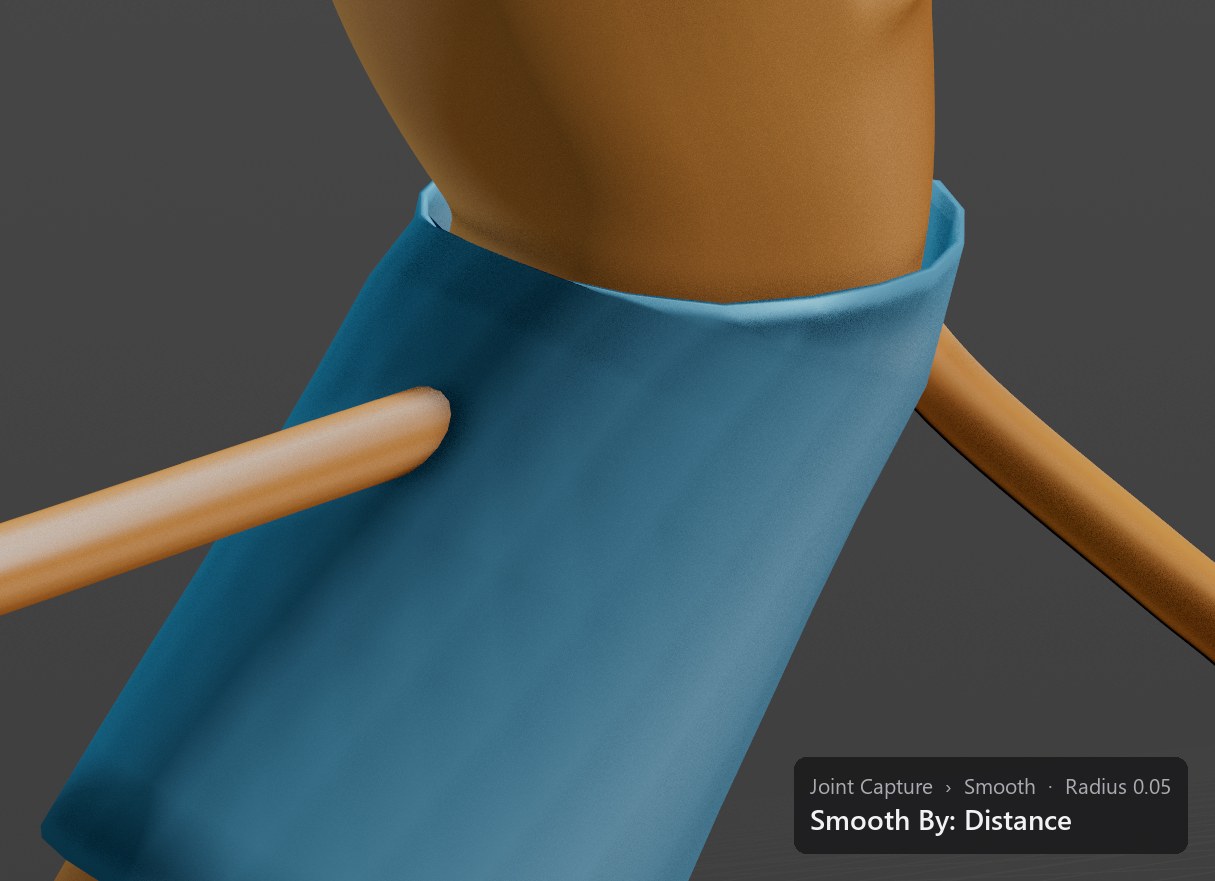
A coat that bends with the body. Smoothed by Distance, the vest takes the weights of the body under it and its collar sits clean round the neck.
Updatedth::cuda_joint_capture::1.0

Weights that cross the gap

Joint Capture smoothed its weights along the mesh edges, so a coat over a body, buttons or teeth smoothed on their own and bent differently from the skin under them. Set Smooth By to Distance and smoothing reaches every point within a radius, across the gap: separate pieces take the weights of what they sit on, the same on any mesh density.

In depth in Capture
Video Locality 1 in the Animate state. The forearm's middle Layer 2 control dragged up and back: only the forearm moves, the upper arm stays on the wire of its rest shape.
Updatedth::apex_spline::6.0

Layer controls stay local

A Layer 2 control between the elbow and the wrist also moved the upper arm, a few millimetres, all the way to the shoulder. Locality is back in the Shape tab and on for new nodes: the Layer 1 CVs act as walls, so a Layer 2 control only moves the joints between the two CVs around it, and the curve stays smooth through the elbow.

In depth in Splines
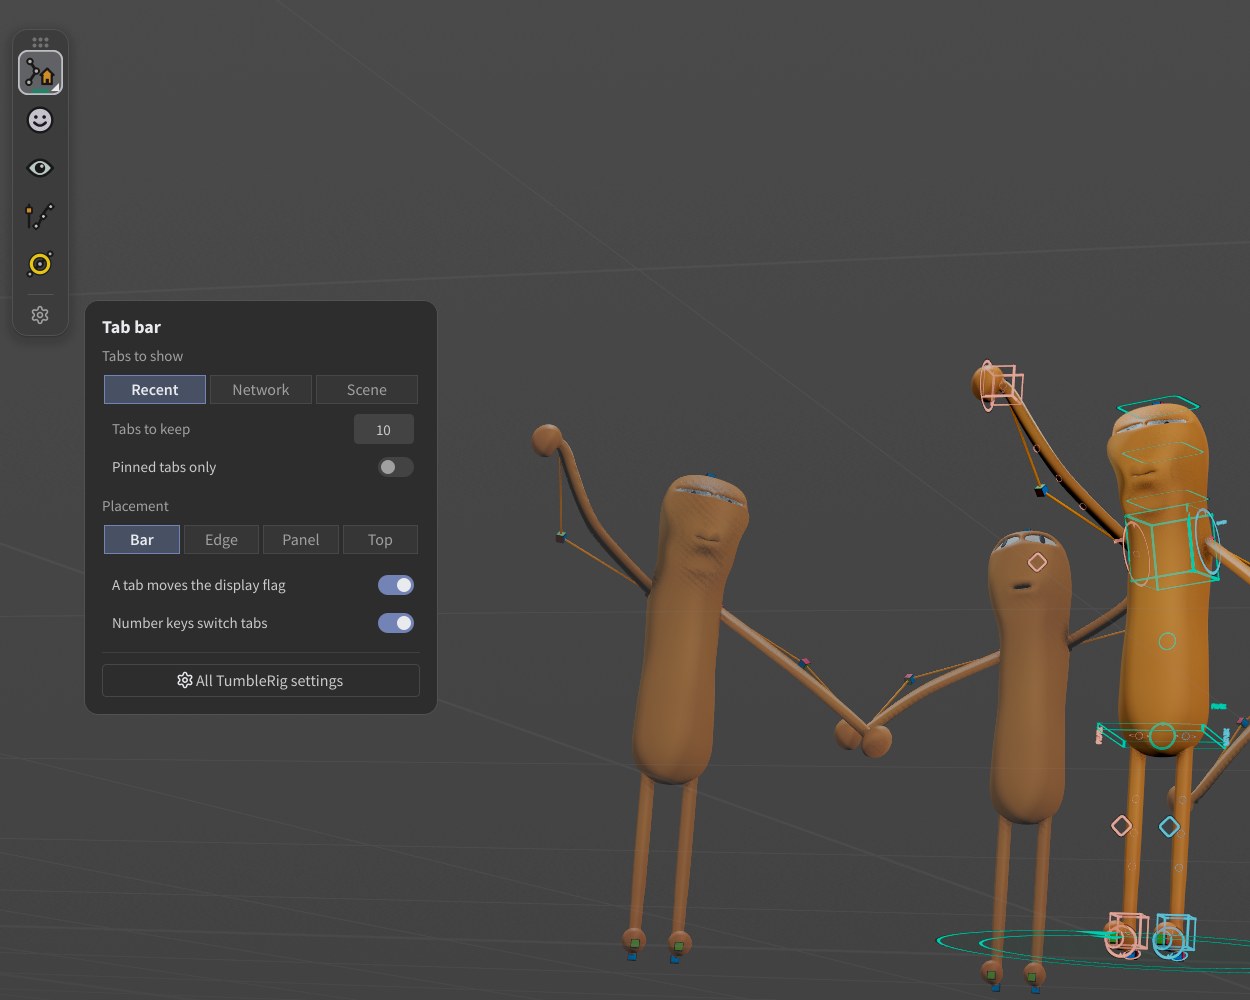
Recent tools on the tab bar. The bar on the left lists the five tools used last; its gear opens the quick settings beside it.
Tool

Lighter viewport tools in big scenes

In shots with several rigged characters, TumbleRig's scans of the whole scene could freeze Houdini. The tab bar now lists the tools you used last instead of every rig in the scene and never cooks a node to draw a tab, opening a scene no longer walks its nodes, and Tool Panels open about eight times faster. A gear on the bar opens its quick settings, and one switch in TumbleTrove Settings turns every TumbleRig viewport HUD off.

In depth in Viewport tools
In depth
Capture and deformation

Capture, region by region

A new node that merges captures, and Joint Capture smoothing and mask blur that reach across gaps.

capture_merge 1.0cuda_joint_capture 1.0
Newth::capture_merge::1.0Highlight

Capture Merge: one capture per region, one node to merge them

The problem: one capture node sets one rule for the whole mesh, but the hands want tight cages, the torso a wide soft falloff and the head only its own joints. With Capture Merge, give each region its own capture node with its group, cages and settings, wire them all into Capture Merge like a Merge SOP and feed the result to apex_bonedeform: each point keeps the weights of the node that captured it. Find it in the Tab menu under TumbleRig, or in the Asset Browser under Capture.

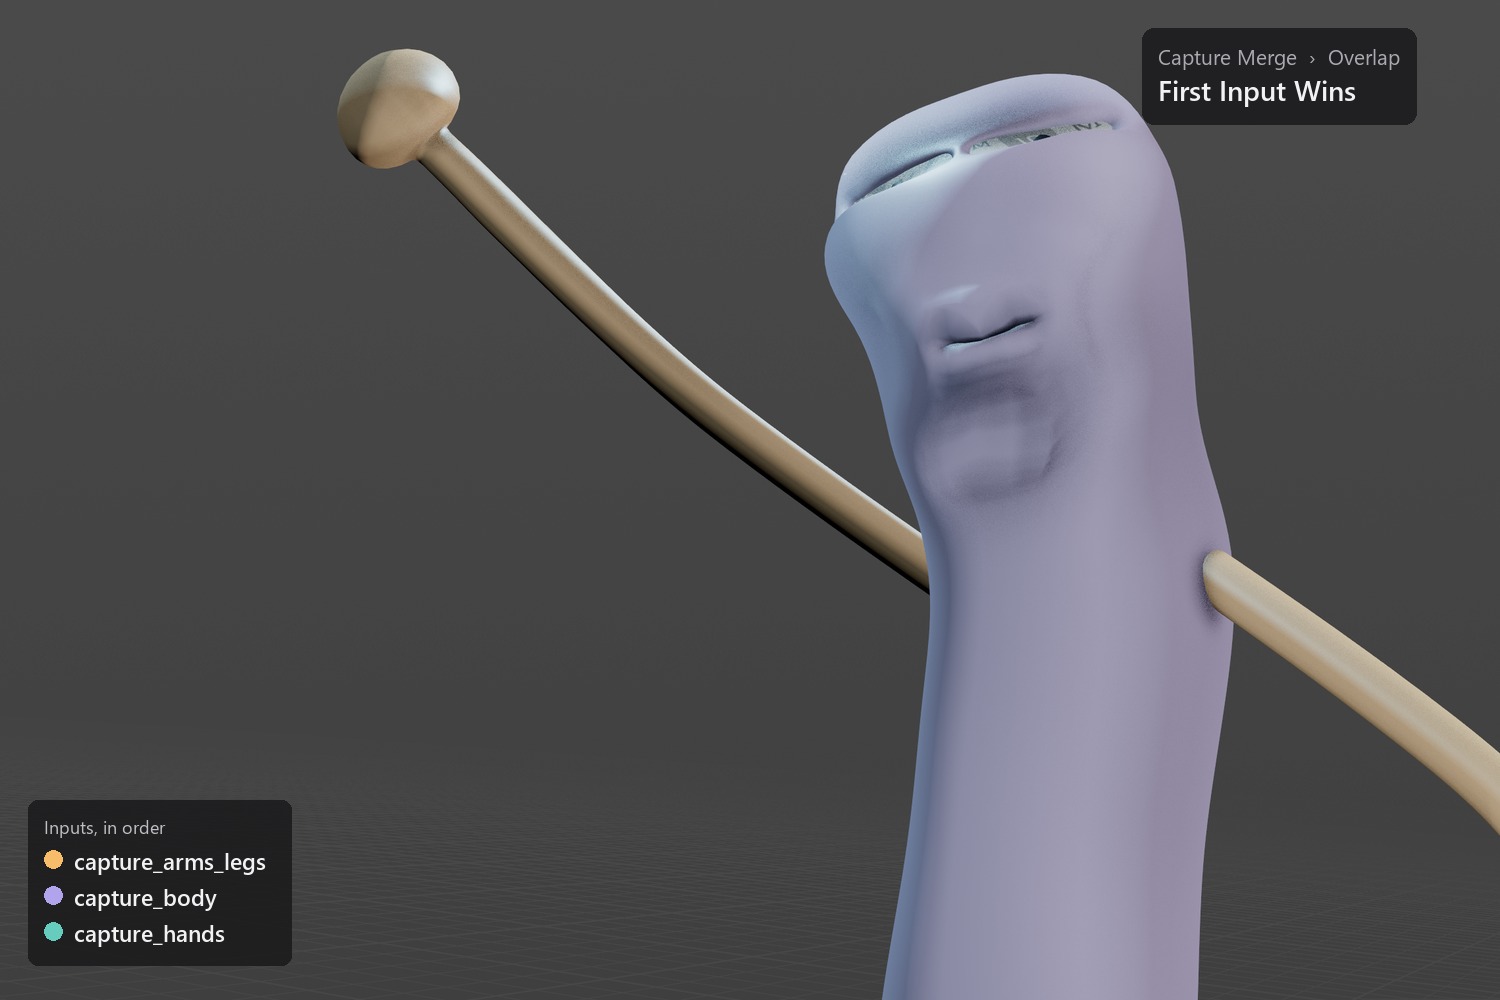
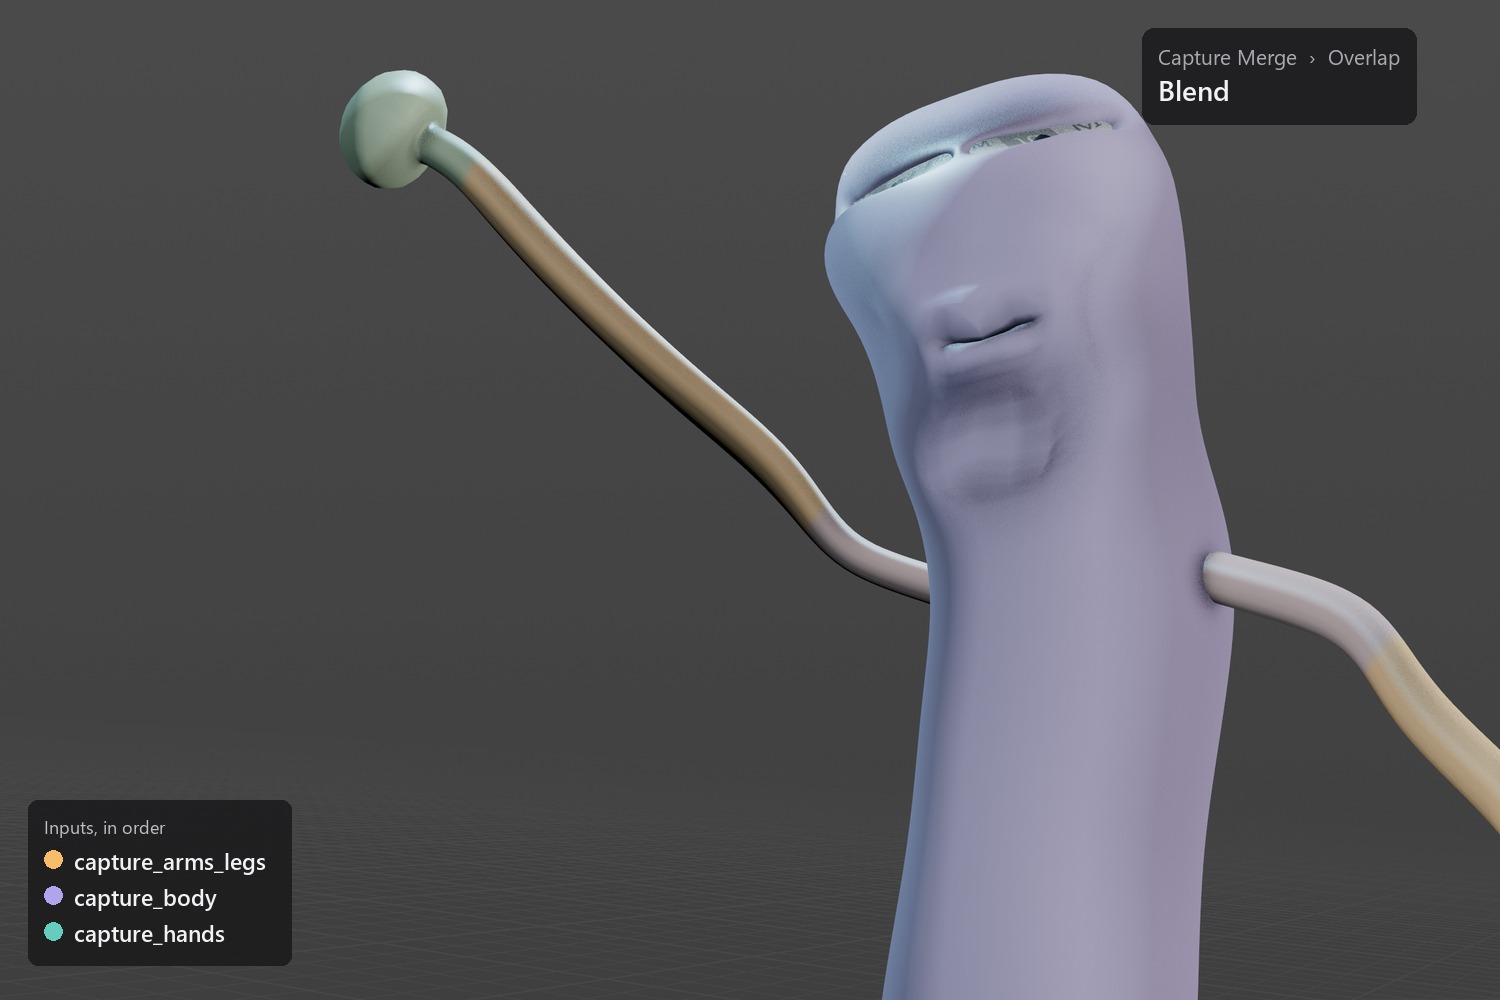
  • Overlap decides points that more than one input captured: Last Input Wins (the default), First Input Wins, or Blend.
  • Points no input captured stay uncaptured, and the node warns about them, and about inputs that add nothing.
  • Wire the same mesh into every input, each captured its own way. It runs on the CPU on every thread: a million points from three inputs in about 19 ms (measured on Windows).
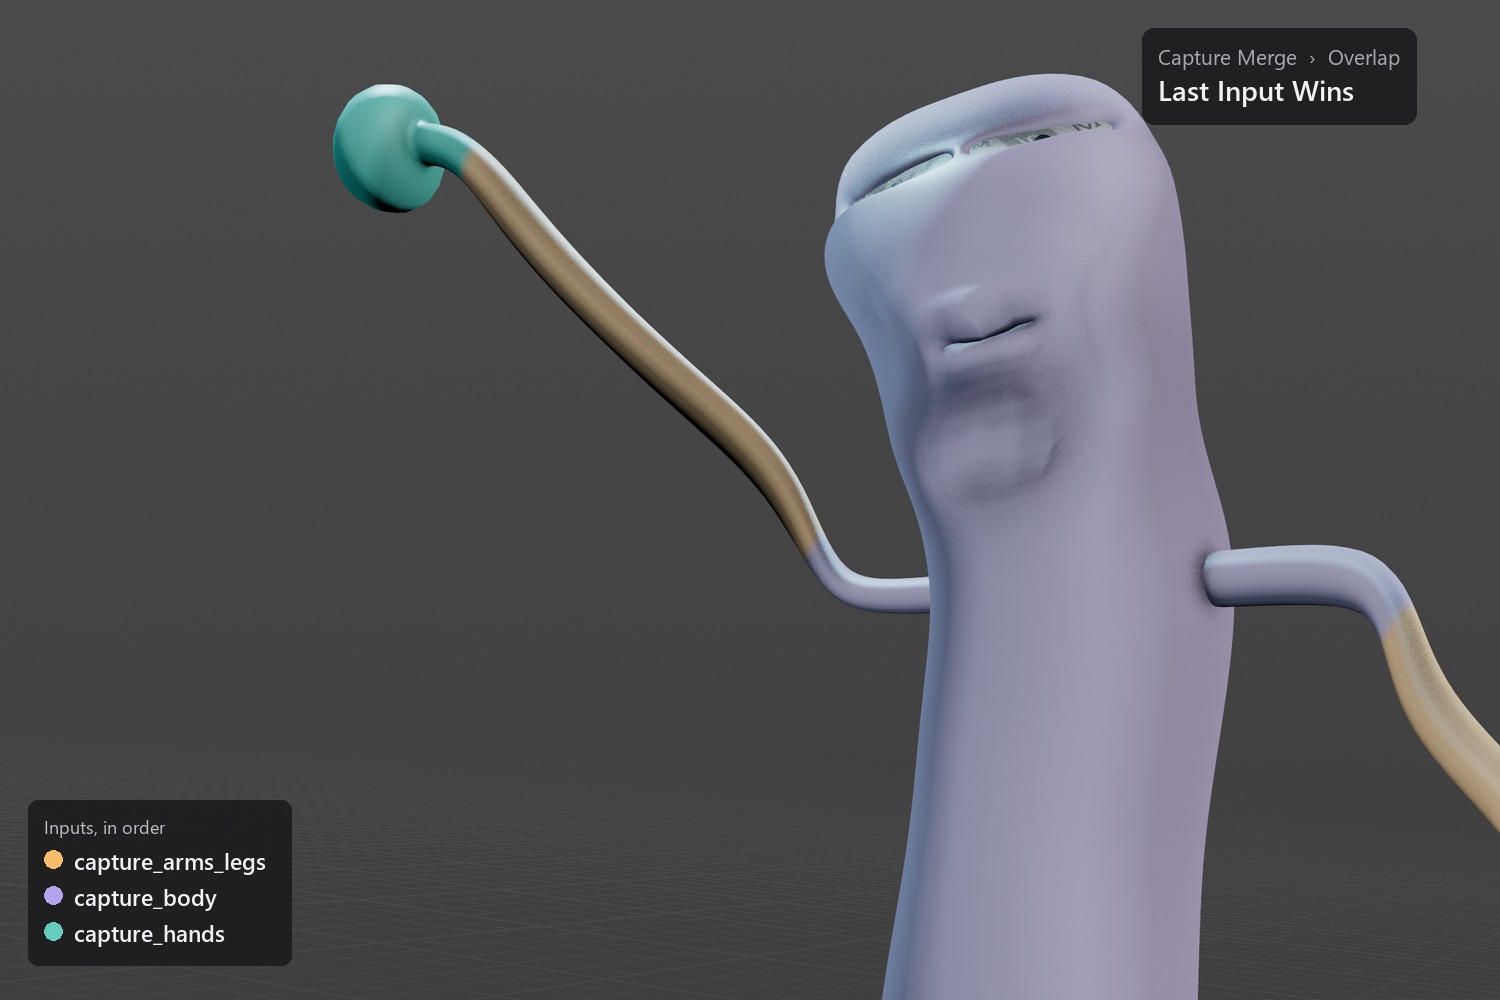
Video Each region bends with its own joints. Arms and legs, body and hands, each from its own Joint Capture and tinted by the input it kept, posed from rest and back.
Last Input WinsFirst Input WinsBlend
One shoulder, three Overlap settings. Where two inputs capture the same points (the shoulder, the hand), Last Input Wins keeps the later input, First Input Wins the earlier, so the whole arm bends from its root, and Blend mixes their weights for a softer bend.
Updatedth::cuda_joint_capture::1.0Highlight

Smooth By Distance

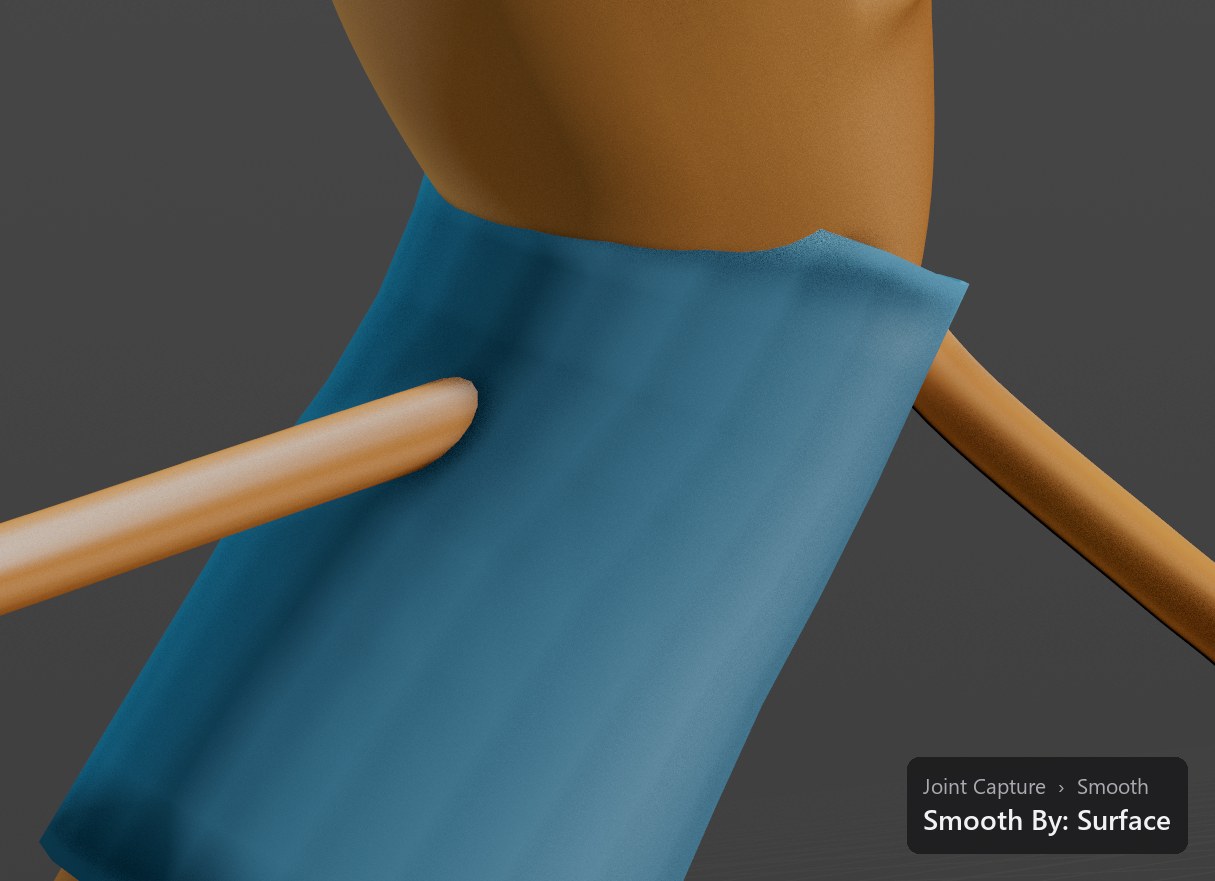
The problem: smoothing ran along the mesh edges, so it stopped at every gap: a coat over a body, a row of buttons or a set of teeth smoothed on their own and bent unlike the skin under them. In Joint Capture's Smooth folder, set Smooth By to Distance and pick a Radius in scene units: every point within the radius is averaged in 3D, across the gap, so separate pieces take the weights of what they sit on, the same on any mesh density. Surface stays the default, so saved scenes keep their weights.

Smooth By: Distance. Smoothing reaches across the gap: the vest takes the weights of the body under it and its collar sits clean.Smooth By: Surface. The vest smooths on its own; bent with the body, the neck breaks through its collar.SurfaceDistance
Surface Smooth By: Surface. The vest smooths on its own; bent with the body, the neck breaks through its collar.Distance Smooth By: Distance. Smoothing reaches across the gap: the vest takes the weights of the body under it and its collar sits clean.
Updatedth::cuda_joint_capture::1.0

Blur the capture mask

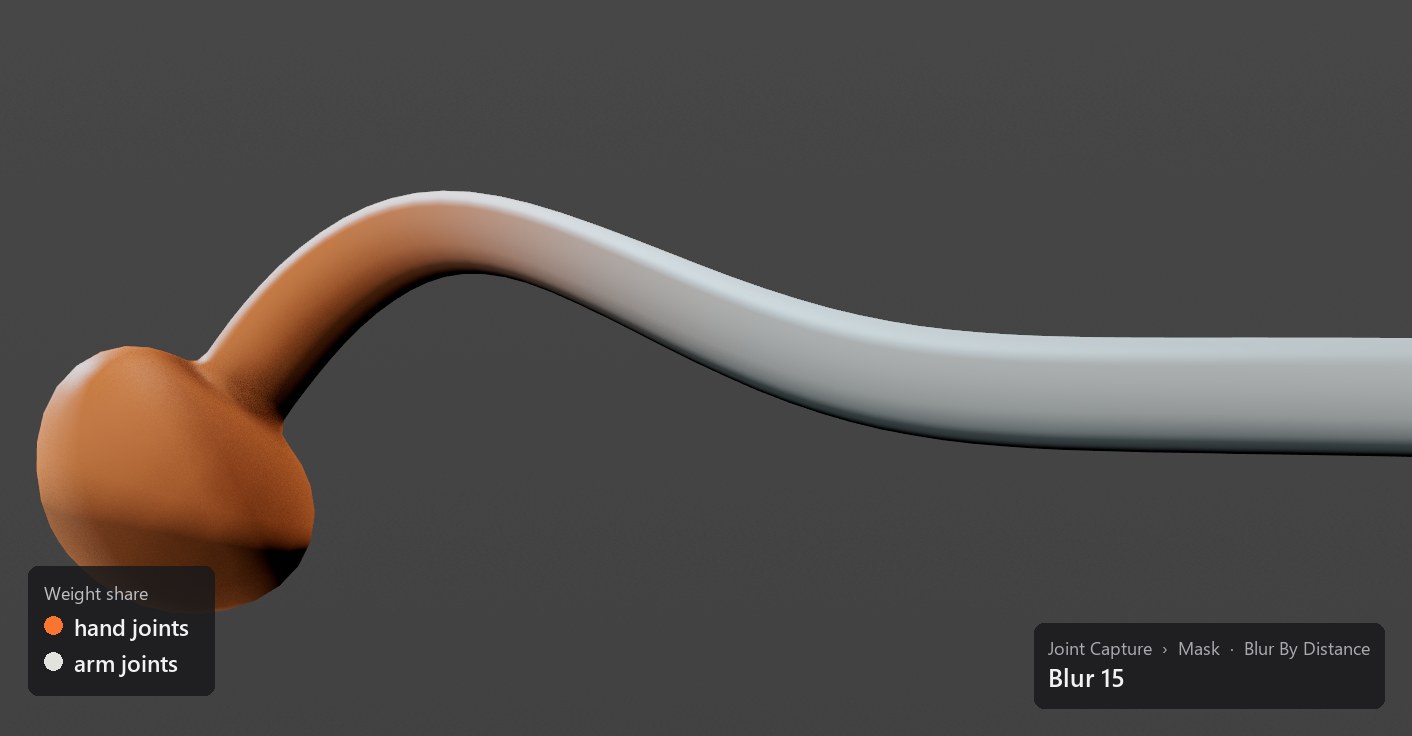
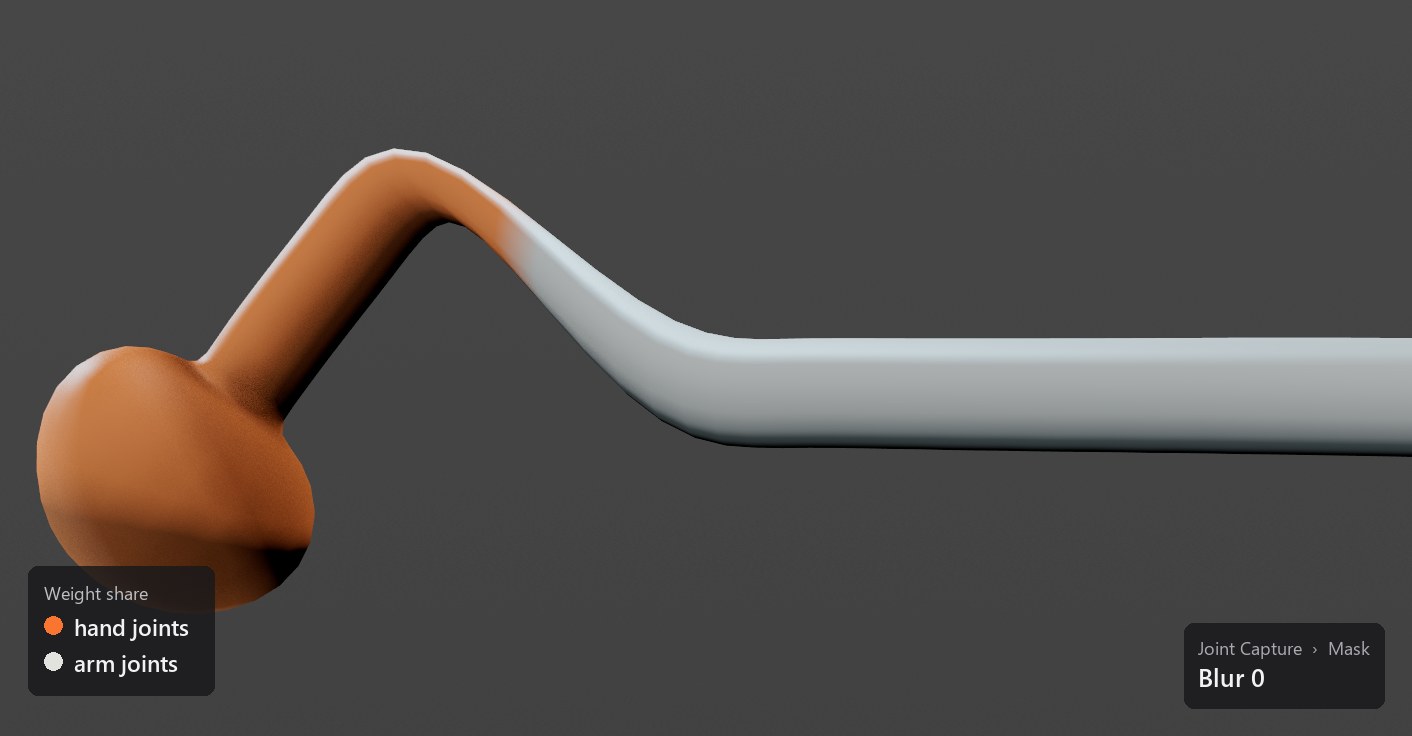
A hard mask edge made a hard seam in the weights. The Mask folder gets Blur, Blur By (Surface or Distance) and Blur Radius, so a hard edge becomes a soft blend. It blurs a copy: the mask attribute or geometry you made is never changed, and the Mask view in the viewport shows the blurred mask. Blur 0, the default, leaves the mask as it was.

Mask Blur 15, Blur By Distance. The hard edge becomes a soft blend and the forearm bends smoothly.Mask Blur 0. A box masks the hands capture with a hard edge across the forearm: the weights switch at once and the arm kinks at the seam.Blur 0Blur 15
Blur 0 Mask Blur 0. A box masks the hands capture with a hard edge across the forearm: the weights switch at once and the arm kinks at the seam.Blur 15 Mask Blur 15, Blur By Distance. The hard edge becomes a soft blend and the forearm bends smoothly.
Splines

Layer controls that stay local

apex_spline 6.0 gets Locality back, and the noodle example moves to apex_spline 6.0.

apex_spline 6.0apex_rigExample_noodle 1.2
Updatedth::apex_spline::6.0Highlight

Locality: a layer control stops at the CVs around it

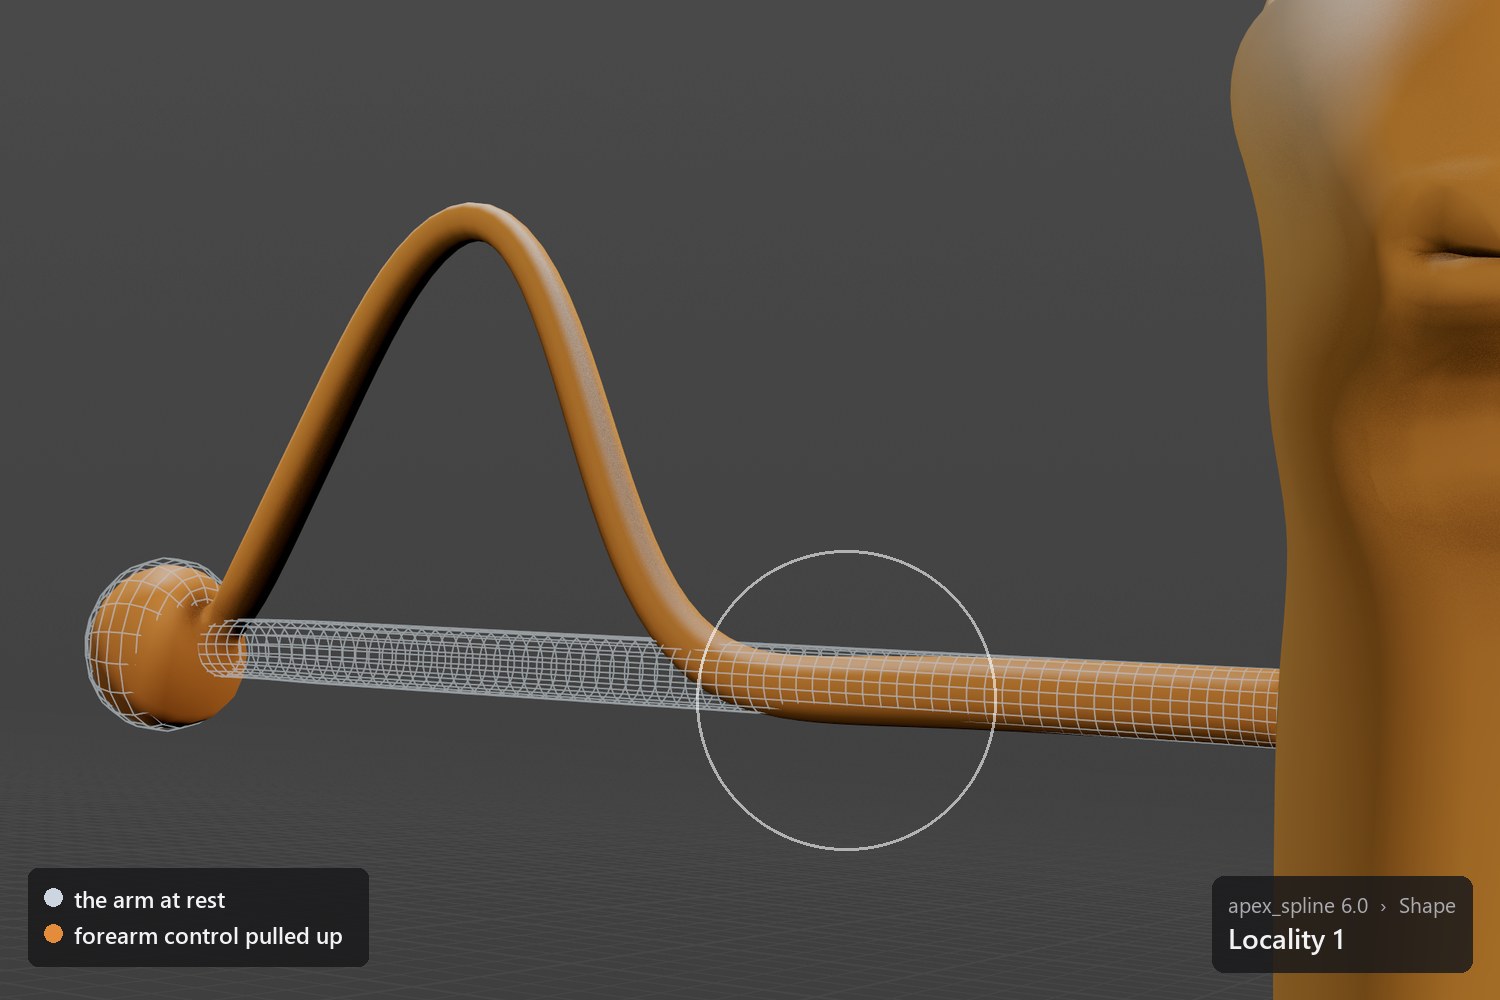
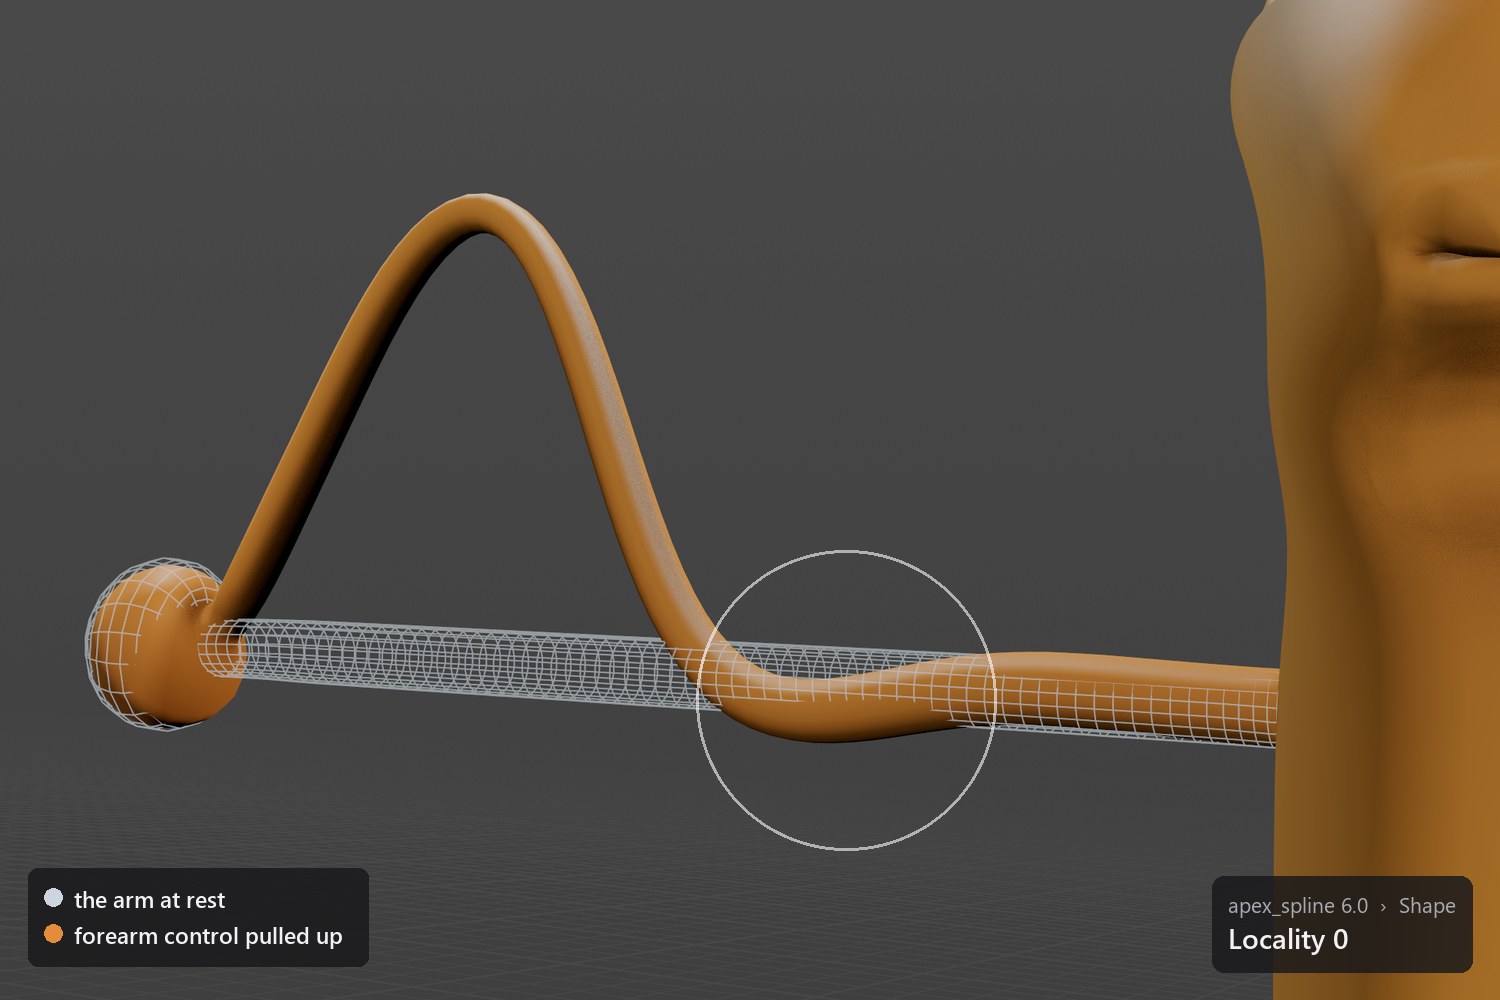
The problem: on a spline with Layer 2, a control between the elbow and the wrist also bent the upper arm, a few millimetres next to the elbow and a little all the way to the shoulder. Locality is back in the Shape tab (after Roundness) and starts at 1 on new nodes: the Layer 1 CVs are walls, so a Layer 2 control only moves the joints between the two CVs around it, Post Smooth and Even Spacing stop at the walls too, and the curve keeps its direction through each wall, so the elbow stays smooth. Locality 0 gives the one-piece curve of 1.13.

  • On the noodle's arm, pulling the forearm's middle control 10 cm moved the upper arm up to 4.7 mm; at Locality 1 it does not move at all.
Locality 1. The same pull: only the forearm bends, the upper arm stays on its rest shape.Locality 0. The forearm's middle Layer 2 control pulled up: the upper arm dips below its rest shape next to the elbow.Locality 0Locality 1
Locality 0 Locality 0. The forearm's middle Layer 2 control pulled up: the upper arm dips below its rest shape next to the elbow.Locality 1 Locality 1. The same pull: only the forearm bends, the upper arm stays on its rest shape.
Newth::apex_rigExample_noodle::1.2

The noodle example on apex_spline 6.0

Noodle example 1.2 builds its arms, legs and spine on apex_spline 6.0, gets heel joints and controls from Fit Skeleton 3.1, and new face shapes sculpted for it (Closed Smile, Chad and Asymmetry), each with its own apex_blendshapes 3.0 slider. apex_ik_spline 1.2 builds on apex_spline 6.0 too. 1.1 stays installed, so a saved scene keeps its rig.

Noodle example 1.2 in the Animate state. One hand up, one bent down and the chest turned, every limb on apex_spline 6.0.
In the viewport

Lighter viewport tools

The tab bar, the header and the HUD of every TumbleRig tool, tuned for scenes with many characters.

The tab bar lists the tools you used

The problem: in shots with several rigged characters, the tab bar walked every node in the scene several times a second, and again on every load, which could freeze Houdini. Tabs to show now starts on Recent: the last ten tools you used, however you entered them (Tabs to keep, 1 to 30), with Network and Scene still there when you want them, and the bar never cooks a node to draw a tab. The gear at the end of the bar opens its settings beside it (tabs to show, sort, pinned only, placement, the display flag and number keys), each applied at once.

Video Quick settings on the tab bar. The gear opens them; Tabs to show: Scene lists every tool per character, Recent the five used last; a click outside closes them.
Tool

Tool Panels open eight times faster

Opening a Tool Panel no longer flashes each new row up as a window of its own: entering eight tools twice spent 0.7 s building panels on 1.13 and 0.09 s now, and the spline's panel opens in 23 ms instead of 229. The header and toolbar shadows are drawn as one layer each instead of fourteen, which gives back the frame rate 1.13 lost while orbiting in a rig tool (GPU time per frame 16.4 to 14.0 ms on a 4K viewport), and panels never cook the rig from a timer or while a scene loads.

  • Measured on Windows.
Tool

One switch for the whole viewport HUD

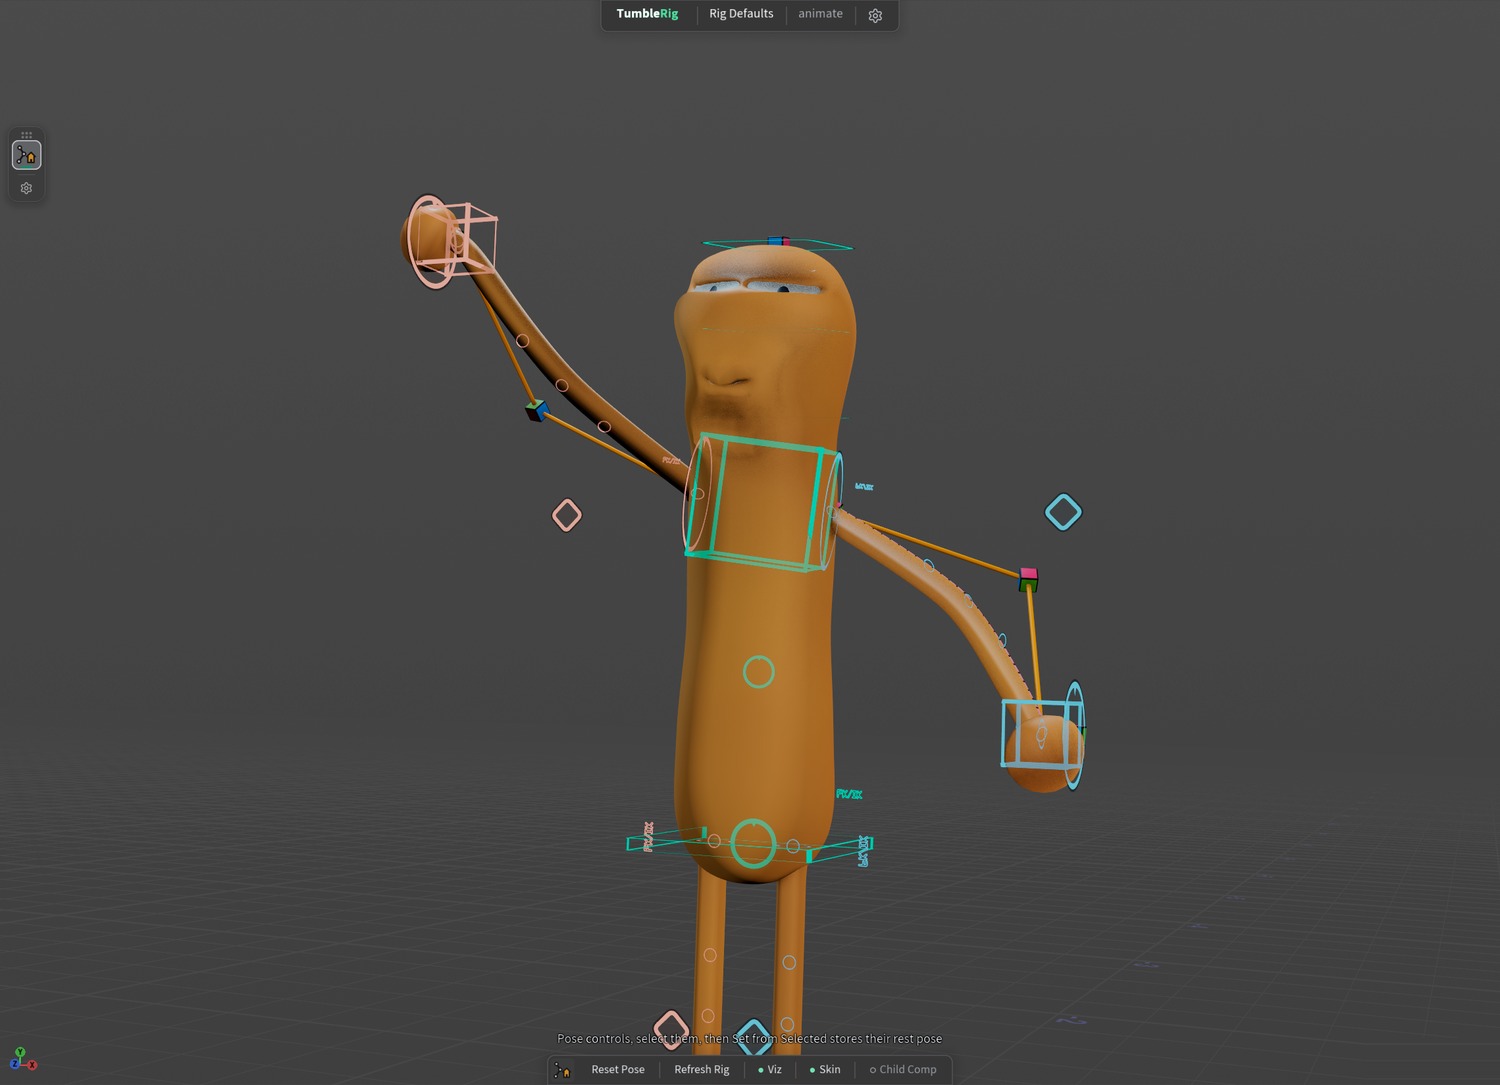
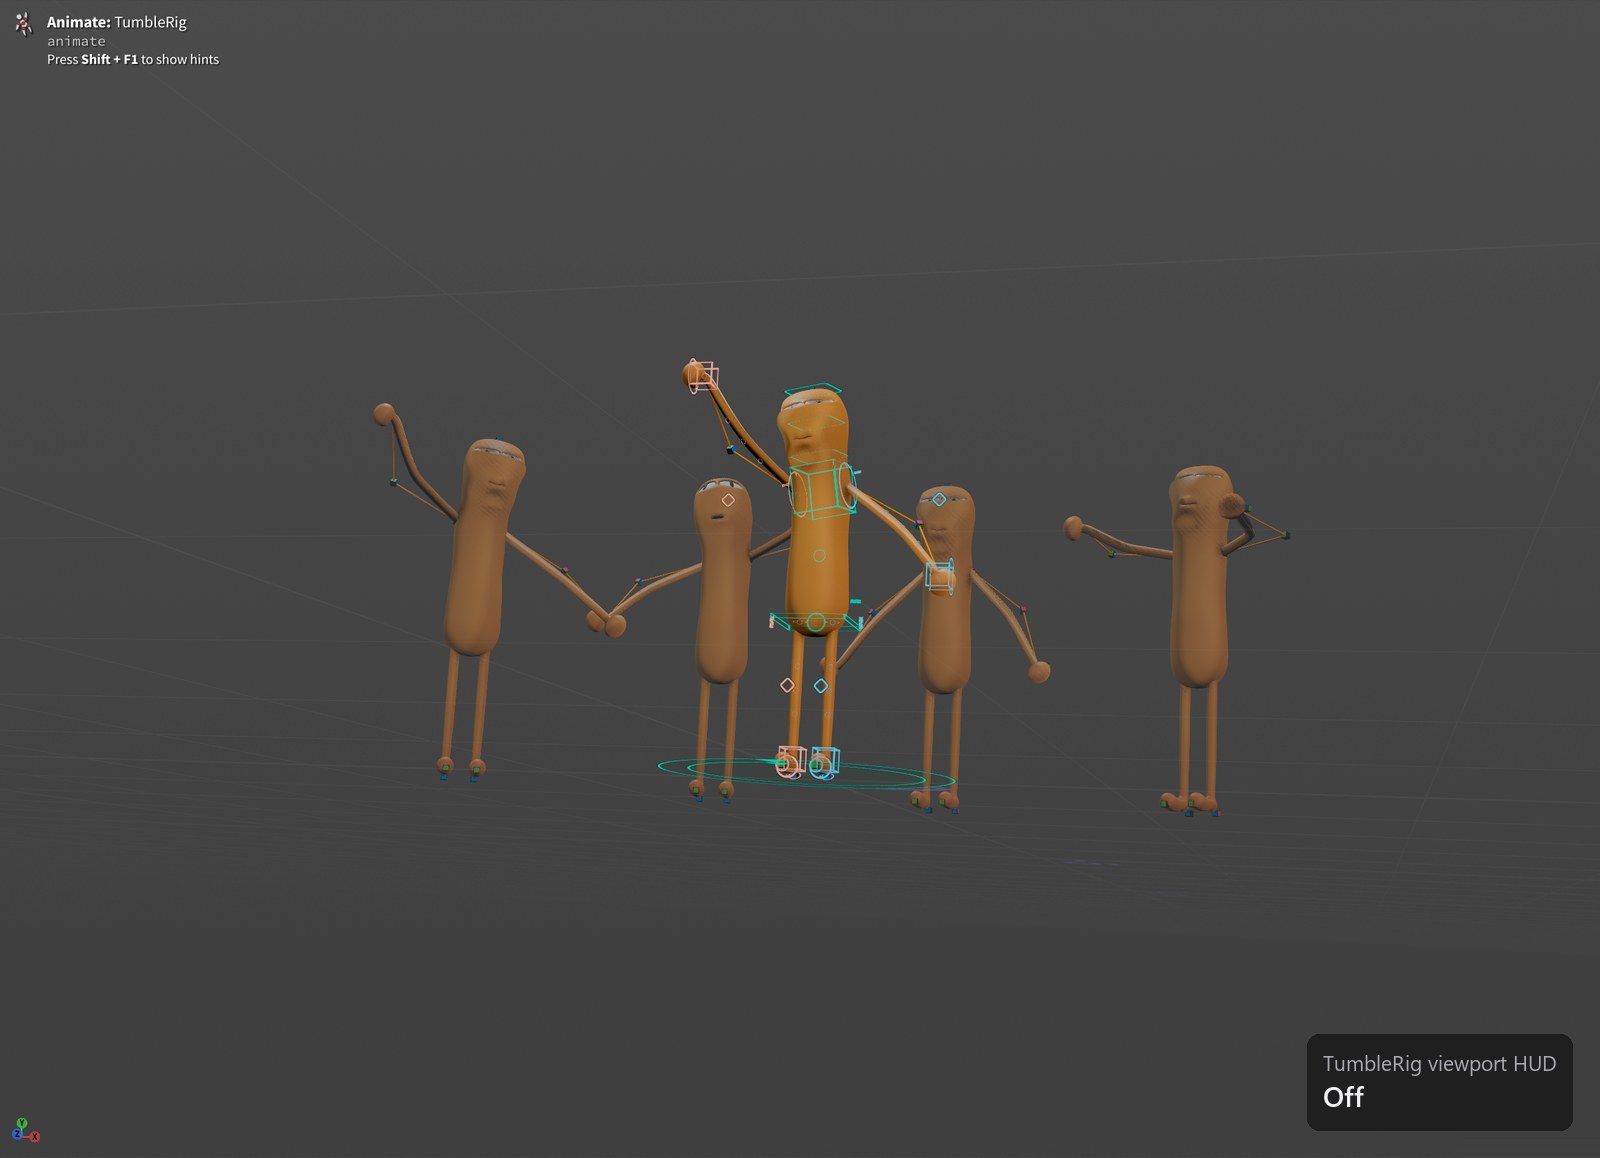
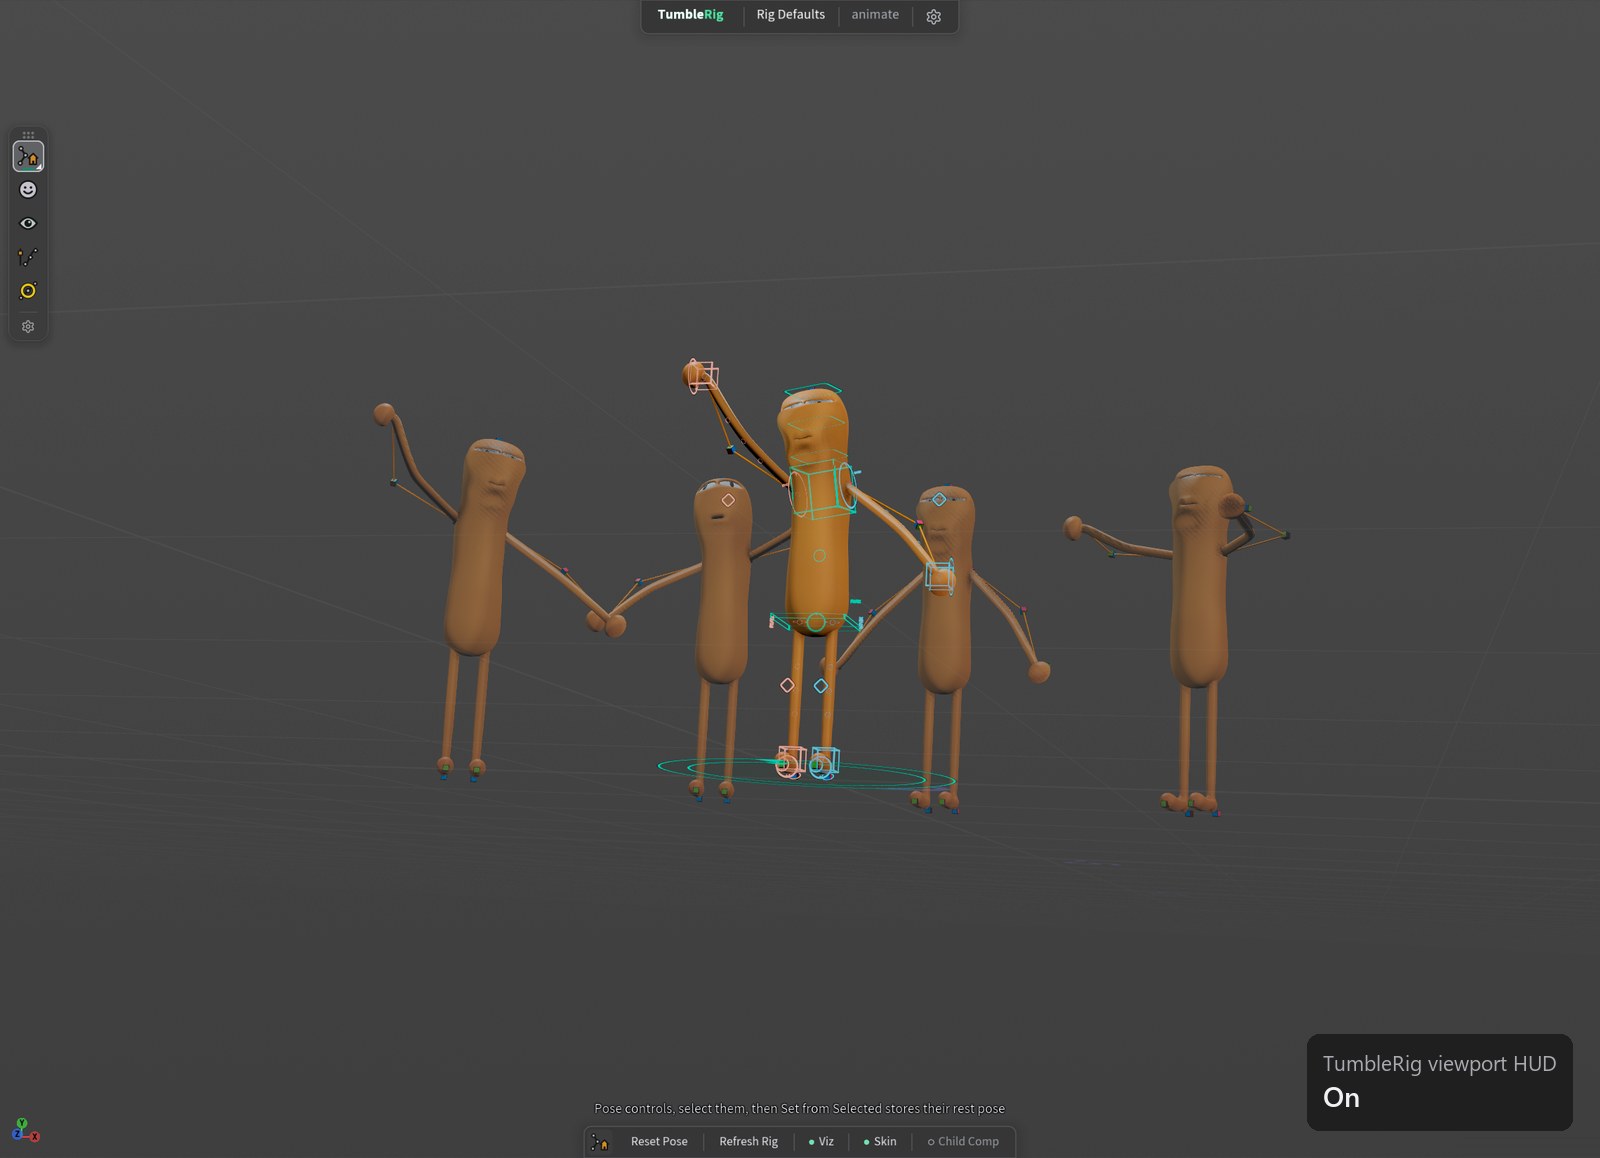
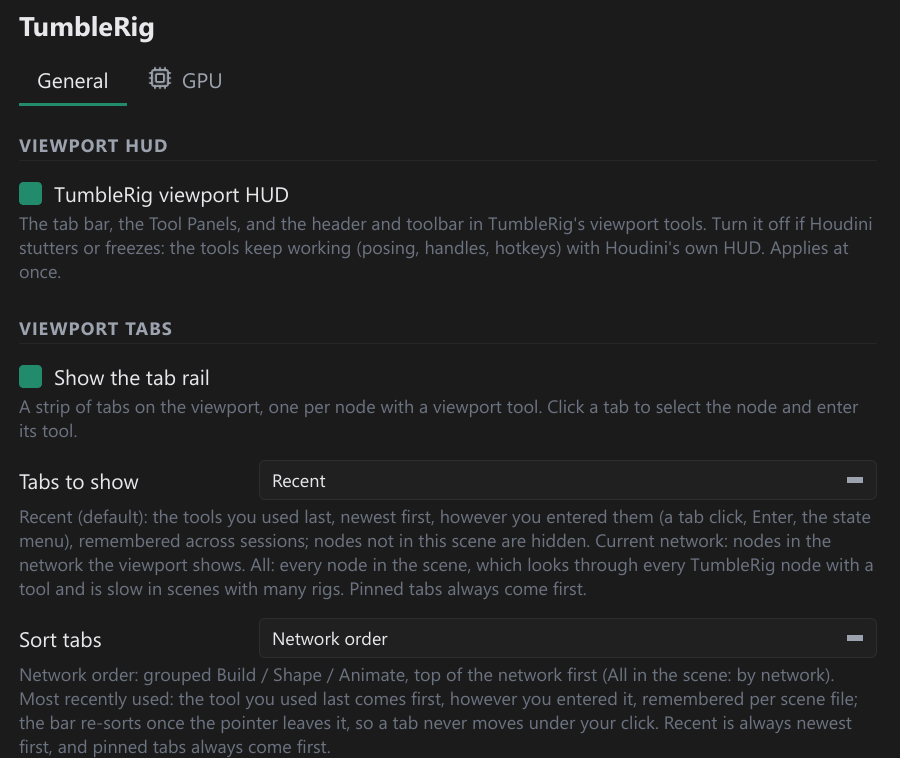
If Houdini stutters, TumbleRig viewport HUD turns it all off at once: no tab bar, no Tool Panels, no header, toolbar or hint line in the tools. The tools keep working (posing, handles, hotkeys) with Houdini's own HUD, and the change applies at once. It is the first switch on the new General tab of TumbleRig's page in TumbleTrove Settings, which the gear in every tool's header opens directly.

TumbleRig viewport HUD: Off. No tab bar, header or toolbar; Houdini's own state HUD is back and the controls still work.TumbleRig viewport HUD: On. The tab bar, and the running tool's header, hint line and toolbar.OnOff
On TumbleRig viewport HUD: On. The tab bar, and the running tool's header, hint line and toolbar.Off TumbleRig viewport HUD: Off. No tab bar, header or toolbar; Houdini's own state HUD is back and the controls still work.
The switch. TumbleTrove Settings, TumbleRig, General: TumbleRig viewport HUD first, Viewport Tabs below.
Tool

Update an old node from its tool

Every TumbleRig tool's header now shows the node's version after its name: grey while it is the newest installed, amber with a warning icon beside it when a newer one is. Click the warning and Update to the newest version: the node is swapped in one undo step, its settings kept where the names match, and the tool opens again on the new node. Scan all nodes lists every other old TumbleRig node in the scene, each with a Select button that frames it in the Network Editor. The scan runs only when you press it.

Video An out-of-date node, one click away. The warning icon in the tool header opens its window: Update to 2.0 for this node, and Scan all nodes lists the other old ones, each with Select.
Fixed

Control Parms HUD: sliders keep in range

In the Animate state's Control Parms HUD (G), a blendshape slider could be dragged below 0. Every slider now stops at its control's limits, G keeps the HUD open, and the toolbar stays centred on the viewport when the HUD opens.

Video Sliders keep in range. G opens the Control Parms HUD; the cursor drags Closed smile past its end and it stops at 1.
Fixed

Fixes you will notice

cuda_joint_capture 1.0apex_eye_rig 1.1apex_rigExample_noodle 1.2
Fixedth::cuda_joint_capture::1.0

Joint Capture refuses a mesh in its Capture Pose input

Shaking a node loose from a capture chain could rewire the mesh into Joint Capture's Capture Pose input, and Houdini crashed trying to capture with every point as a joint. Joint Capture now stops with an error that says what to rewire when that input gets the Rest Geometry, closed faces that are not capture cages, or more than 10,000 points without joint names. Capture cages merged into the skeleton still work, and real skeletons capture exactly as before.

Fixedth::apex_eye_rig::1.1

Nodes inside nodes are up to date

The eye rig, apex_joints, apex_ik_chains, apex_inverse_foot and apex_space_switcher now use the newest TumbleRig nodes inside, so diving into them shows the current nodes. They build exactly the same rig as before.

Fixedth::apex_rigExample_noodle::1.2

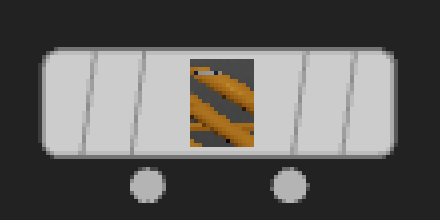
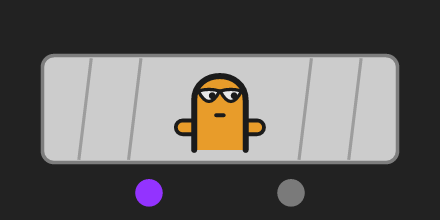
A drawn icon for the noodle example

The noodle example's icon was a render that Houdini squeezed into an orange smudge. It is now drawn like every other TumbleRig icon.

Before: the render, squeezed into the node's icon box.Now: a drawn icon, like every other TumbleRig node.
Before Before: the render, squeezed into the node's icon box.Now Now: a drawn icon, like every other TumbleRig node.
Fixed

The HUD stays with Houdini

The tab bar's settings popup could stay on top of other applications after you switched away from Houdini. Popups and hover labels now close when Houdini loses focus, and the Tool Panels, the tab bar and Quick Actions stop updating and never come forward while Houdini is in the background.

Fixed

The TumbleRig wordmark lines up at any UI scale

The two colours of the wordmark in the tool header no longer overlap on high-DPI displays.

For existing scenes

Upgrading

New versions install next to the old ones, and a saved scene keeps the version it was built with until you swap the node. One exception: apex_spline 6.0 changed in place, see its row.

NodeWasNowWhat to know
apex_rigExample_noodle1.11.2Built on apex_spline 6.0, with heel joints and new face shapes: Closed Smile, Chad and Asymmetry replace Smile, Frown and the asymmetric head, so keys on those channels do not carry over. Posed limbs sit a little differently (up to 7.6 cm in an IK stretch). 1.1 stays installed for saved scenes.
apex_ik_spline1.11.2Its guide and joint splines are apex_spline 6.0. The rest pose is identical, poses within 1 cm.
apex_spline6.06.0Changed in place: Locality is read again. New nodes start at 1 (a layer control stays between its two CVs). A node saved with 1.13 keeps the Locality it was saved with: 0, the 1.13 curve, unless it was swapped from 5.1, which now uses 5.1's Locality again.
From the commit history

Every change

25 changes since v1.13.0

New in 1.14.0 (25)

  • Joint Capture: refuse a mesh in the Capture Pose input instead of crashing
  • Tool header: the node's version after its name, the warning beside it
  • HUD windows stay with Houdini: no popups over other applications
  • noodle example 1.2: Locality 1 on its nested splines
  • Capture Merge: multithreaded, 1M points in 19 ms instead of 158 ms
  • Tool Panels open about 8x faster: a new row never flashes up as its own window
  • Tool Panels and count labels never cook from their timers or during a scene load
  • Settings: TumbleRig's first page is "General", with the viewport HUD switch on top
  • Out-of-date warning: the tool's own node only, with Update and Scan all nodes
  • No pass over the scene's nodes on load or in the background
  • apex_rigExample_noodle 1.2: the blendshapes sculpted in the noodle rig workfile
  • Tool header: out-of-date nodes show as a warning icon with a list
  • Capture Merge: one node merges the capture weights of many capture nodes
  • cuda_joint_capture: Mask Blur, by Surface or Distance
  • apex_spline 6.0: Locality walls, a layer control stops at the layer below
  • cuda_joint_capture: Smooth By Surface or Distance
  • TumbleRig viewport HUD setting to turn it all off; the tab bar lists Recent tools by default and never scans the whole scene
  • Tab bar: a gear opens quick settings beside it
  • Header warns when the scene has TumbleRig nodes on an older version
  • Header: the TumbleRig wordmark's two colours line up at any UI scale
  • Control Parms HUD sliders keep inside the controls' limits; G keeps the HUD open
  • Viewport tools: the toolbar stays centred when the Control Parms HUD opens
  • apex_ik_spline 1.2 and apex_rigExample_noodle 1.2: every nested TumbleRig node on its newest version
  • Nested TumbleRig nodes on their newest versions: eye rig, joints, IK chains, inverse foot, space switcher
  • noodle example: a drawn icon instead of the character render